Macarons are definitely a luxurious treat
and buying them could set you back £20 for 12 which seems quite extravagant for
such a quick eat. Making them yourself is much easier than you think; much
of the difficult hype is poppycock, plus you can make them for a fraction of the cost. If you're able to gently fold dry ingredients into
wet and have some basic piping skills you should have little trouble making
them yourself. It just takes practice.
I first made them a few months ago when I
took a macaron making course on a rainy Saturday afternoon in London. The instructor was
a very jolly woman who was mad about them and showed us how easy they
were to make. I think there were around 12 people on the course with a full
range of baking experience and we all managed to turn out great to decent macarons.
Best of all, she made sure we came home with at least a dozen macarons each.
To prove how easy they are to make, I made
a batch last night to bring in for work. I halved the recipe and managed to
make two-dozen and they’ve been well received in the office.
Ingredients:
250g ground almonds
400g icing sugar
225ml egg whites
100g sugar
Flavouring of choice
Food colouring
Flavoured buttercream, ganache, or jam
Instructions:
- Preheat the oven to 160C/320F.
- Line two baking sheets with non-stick liners and set aside.
- Sift the icing sugar and ground almonds together in a bowl and set aside.
- Whip the eggs to soft peaks and then add the sugar 1tbs at a time. Add your food colouring and flavor and whip until fully incorporated until the egg whites are glossy.
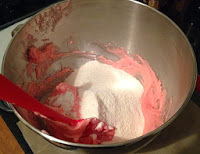
- Holding the mixing bowl pour a third of the almond mixture into the egg whites and fold in gently. I use a big scoop around technique that works well for me, but use whichever way works for you.
- Pour the second third of the almond mixture and mix together thoroughly. Continue with the third as above.
- If you want to add in pieces of freeze-dried fruit you can gently fold them in as well.
- Gently pour half of the dough into a piping bag and tie off at the top and snip the bottom in a straight line – you could use a round tip for this as well.
- Spread a small amount of dough onto the underside of the four corners of the liners to ensure they don’t pull up and ruin the piped macarons.
- Begin piping small rounds in even rows on
the liners taking care not to pipe them too close. As you can see I've piped these too close but I was able to separate them once they were cooked.
- Once finished lightly smack the cooking sheet on the counter to get rid of any excess air bubbles.
- Let the macarons dry for up to 30 minutes, or more if it’s a particularly humid day.
- Place the macarons into the preheated oven and bake for 10-12 minutes turning the sheet halfway through.
- Take out of the oven and completely cool before matching up pairs and filling with buttercream or ganache.
You can present them in a simple white box
tied with a ribbon and really impress your friends or you can keep them all to
yourself.
I’ve found using a non-stick mat/liner
works better than greaseproof paper. I’ve made several batches using
greaseproof with disastrous results and from now on it will only ever be the non-stick liner.


No comments:
Post a Comment