Saturday, 21 December 2013

Not So Scary Macarons


Macarons are definitely a luxurious treat and buying them could set you back £20 for 12 which seems quite extravagant for such a quick eat. Making them yourself is much easier than you think; much of the difficult hype is poppycock, plus you can make them for a fraction of the cost. If you're able to gently fold dry ingredients into wet and have some basic piping skills you should have little trouble making them yourself. It just takes practice.


I first made them a few months ago when I took a macaron making course on a rainy Saturday afternoon in London. The instructor was a very jolly woman who was mad about them and showed us how easy they were to make. I think there were around 12 people on the course with a full range of baking experience and we all managed to turn out great to decent macarons. Best of all, she made sure we came home with at least a dozen macarons each.

To prove how easy they are to make, I made a batch last night to bring in for work. I halved the recipe and managed to make two-dozen and they’ve been well received in the office. 

Ingredients:
250g ground almonds
400g icing sugar
225ml egg whites
100g sugar
Flavouring of choice
Food colouring
Flavoured buttercream, ganache, or jam

 Instructions:

  1. Preheat the oven to 160C/320F.
  2. Line two baking sheets with non-stick liners and set aside.
  3. Sift the icing sugar and ground almonds together in a bowl and set aside.
  4. Whip the eggs to soft peaks and then add the sugar 1tbs at a time.  Add your food colouring and flavor and whip until fully incorporated until the egg whites are glossy.
  5. Holding the mixing bowl pour a third of the almond mixture into the egg whites and fold in gently. I use a big scoop around technique that works well for me, but use whichever way works for you.
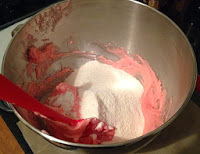
  6. Pour the second third of the almond mixture and mix together thoroughly. Continue with the third as above.
  7. If you want to add in pieces of freeze-dried fruit you can gently fold them in as well.
  8. Gently pour half of the dough into a piping bag and tie off at the top and snip the bottom in a straight line – you could use a round tip for this as well.
  9. Spread a small amount of dough onto the underside of the four corners of the liners to ensure they don’t pull up and ruin the piped macarons.
  10. Begin piping small rounds in even rows on the liners taking care not to pipe them too close. As you can see I've piped these too close but I was able to separate them once they were cooked.
  11. Once finished lightly smack the cooking sheet on the counter to get rid of any excess air bubbles.
  12. Let the macarons dry for up to 30 minutes, or more if it’s a particularly humid day.
  13. Place the macarons into the preheated oven and bake for 10-12 minutes turning the sheet halfway through.
  14. Take out of the oven and completely cool before matching up pairs and filling with buttercream or ganache.

You can present them in a simple white box tied with a ribbon and really impress your friends or you can keep them all to yourself.

I’ve found using a non-stick mat/liner works better than greaseproof paper. I’ve made several batches using greaseproof with disastrous results and from now on it will only ever be the non-stick liner.


Friday, 6 December 2013

Abhi’s Leaving Cake: Delicious Magazine’s Apple Caramel Cake


It’s with a bit of sadness that I made this cake because it’s for a leaving present for one of my work colleagues. Abhi has helped me in my social endeavors from getting my blog up and running to sorting out my Twitter account.  I definitely owe her a debt of gratitude or cake of gratitude in this instance.


I spied this cake on the front cover of Delicious Magazine and thought it looked really tasty. It’s perfect for this time of year when apples are at their best and the darker days make you want something comforting. I’ve made a slight tweak of my own by adding a touch of allspice and ginger to make it a touch more festive since it’s almost Christmas.

Ingredients:

For the layers
340g caster sugar
365g softened butter
5 large eggs
385g plain flour
2tsp baking powder
1tsp ground allspice
2tsp ground ginger
applesauce

For the applesauce
4 cox apples – or any variety that cooks down
50g caster sugar
100ml water

For the apple filling
4 eating apples – or any variety that will hold their shape
50g caster sugar
70g unsalted butter

For the caramel
75g unsalted butter
50g soft brown sugar
70g caster sugar
50g golden syrup
230ml double cream

1 tub Greek yogurt for garnish

Instructions:

For the applesauce
  1. Peel and core the apples and cut into small pieces.
  2. Add the pieces of apple to a medium pan over a medium heat and add the sugar and the water.
  3. Cook the apples until soft enough to press into a puree adding water as needed.
  4. Once cooked set aside to cool.

For the layers
  1. Preheat the oven to 170F.
  2. Butter and line three 20cm cake tins – I’ve used two 10inch round tins.
  3. Using a mixer with the paddle attachment cream the butter and sugar until light and fluffy.
  4. Add in the eggs one at a time until fully incorporated.
  5. Add the cooled applesauce to the butter and egg mixture.
  6. Add in half of the flour along with the baking powder, ginger and allspice and continue mixing. Add in the rest of the flour and mix until just combined. If there are any bits of unmixed flour fold this in gently using a spatula by hand.
  7. Divide the batter between the cake tins and even out with a spatula.
  8. Bake for 30-35 minutes until golden and the edges are pulling away from the tin.
  9. Remove from the oven and let cool completely on a wire rack.

For the apple filling
  1. Peel, core and slice the apples lengthways
  2. Heat the butter in a large pan over a medium/high heat and add the apples and sugar.
  3. Cook the apples, taking care not to break them up, until they have caramelised.
  4. Remove from heat and let cool. 

For the caramel
  1. Add all of the ingredients into a small pan and cook over a medium/high heat.
  2. Stir the mixture until everything combines and then cook for a further 7 minutes bringing the caramel to a boil.
  3. Remove from heat and let cool.

To assemble the cake
  1. Dab a small amount of the caramel onto the cake plate or board to prevent the cake from sliding.
  2. Place one layer onto the caramel and top with a couple of spoonfuls of Greek yogurt.
  3. Place half of the apple filling on top of the yogurt and spoon on the caramel sauce.  Repeat if making three layers.
  4. Place the top layer on top of the filling and top with the apple filling and drizzle the remaining caramel over the cake letting it ooze down the sides.
  5. Let the cake rest for at least an hour before serving for easier cutting.

You can make the applesauce, apple filling and caramel the day before if you are short of time. Also, you could replace the Greek yogurt with sweetened Mascarpone cheese and use salted caramel instead. 


Thursday, 5 December 2013

Flourless Chocolate Cake with Profiteroles


Sometimes you want to have a piece of chocolate cake that doesn’t take much effort yet still delivers a much needed chocolate punch. This flourless chocolate cake from MarthaStewart really is the business.


I couldn’t decide what to make for the final of The Croc Bake Off and I wanted to make something that was both simple to make and impressive. After deciding that I wanted to make something topped with profiteroles I knew I wouldn’t have the time to make my Dr Pepper cake, especially as P and I new parents to a Dandie Dinmont puppy named Dougal. I knew that I’d want to come home from work and play with him rather than stand in the kitchen all night.

As usual, I spread my baking over a couple of evenings making the profiteroles first and storing them, unfilled, in an airtight container. The following night I made the flourless cake and then put the two together at the office the next morning. Fortunately Dougal is more interested in sleeping than much else at the moment so I had time to make the salted caramel sauce and chocolate sauce as well.

Ingredients:
85g unsalted butter cut into pieces
227g dark chocolate 70% as a minimum, chopped finely
6 large eggs separated
112g caster sugar
Icing sugar for dusting
Sweetened whipped double cream for serving

Instructions:
Preheat the oven to 135C and prepare a 9in spring-form pan with butter or cake release spray.

1. Place the butter and chocolate into a microwave safe bowl and melt in 30-second intervals. Stir the mixture between each time until completely melted. Let this cool for around 5 minutes, or while you whip up the egg whites, and then stir in the egg yolks.

2. In a mixing bowl beat the egg whites with the whisk attachment until soft peaks form. Then gradually add the sugar a tablespoon at a time and continue to beat until the eggs are glossy and hold a stiff peak.

3. Using a large spatula, take a large spoonful of the egg whites and mix them into the chocolate mixture until combined. Then add in the rest of the egg whites and fold in gently in stages until combined.

4. Pour the batter into the prepared pan and smooth out the top with the spatula. Bake until the cake pulls away from the sides of the pan 40 – 50 minutes. Place on a wire rack and let cool completely before removing from the pan.

You can either dust this with icing sugar and serve with the sweetened cream or pile profiteroles on the top and drizzle with salted caramel and chocolate sauce.

A Choice of Chocolate Toppings


As much as I love chocolate buttercream, I know it simply won’t do when you’re looking to elevate your baking to a higher level of sophistication. Picking your chocolate is very important since a sauce is all about the chocolate intensity and quality is definitely better than quantity in this particular situation. Personally I like to use Valrhona because it has a beautiful silky texture and it’s incredibly rich; however, you can use whichever chocolate you like best as long as it’s at least 70%.

I have two fail safe recipes that are perfect for toppings cakes, ice cream or pastries.


I stumbled upon this recipe on the Guardian website when I was looking for a chocolate sauce to pour over my profiteroles.  I especially like the fact that Felicity has done all of the hard work testing out different sauces and settling on one that is both easy to make and very tasty.

Ingredients:
150g plain chocolate, broken into small pieces
50ml whipping cream
2tbs golden syrup
Knob of butter
Pinch of salt


  1. Put the chocolate and cream into a small, heavy-based pan over a low heat and stir constantly. It’s important that you don’t rush this and use a higher heat because you will burn the chocolate.
  2. It’s ready once the chocolate has melted and combined with the cream to make a paste.
  3. Stir in the syrup and you’ll notice the sauce begins to loosen and look like chocolate sauce. Stir in the butter and salt to make it glossy.

Keep warm until ready to serve or pour into a jar and heat gently in the microwave when you are ready to use it.

I love the Weck jars I found at Butlers and this recipe is enough to fill up one of the 290ml jars.

Chocolate Ganache
I’ve been using this ganache recipe for a long time and I can’t remember where it comes from, but I do know that it makes an excellent ganache topping. I’ve used it on cakes and cupcakes and even whipped it to make a super rich filling for a chocolate cake.

Ingredients:
250g plain chocolate, broken into small pieces
235ml double cream


  1. Place the chocolate pieces into a heat proof bowl and set aside. Heat the cream in either the microwave or in a small pan over a medium heat until just before boiling point.
  2. Remove from heat and pour over the chocolate pieces and whisk until smooth.

Set aside to let cool for around ten minutes and then pour over the top of your cake. You can whip the ganache to a fluffy consistency, perfect for spreading with a palate knife or a filling, by allowing it to cool completely and then mixing with the whisk attachment on your mixer.